Installing ROCm 3.3.0 for Deep learning on Ubuntu 18.04

Goal

We all know AMD VEGA 56 and VEGA 64 are powerful GPUs competitive to NVIDIA RTX 2080 Ti, the Radeon VII is even more powerful with 13.44 TFLOPS FP32 (float) performance (Theoretical) with a lower price at 699 USD.

I was thinking about having a Deep Learning machine, and I looked at the price for NVIDIA 2080 Ti, it is around 1548 USD here. So I made a call to my friend who sells 2nd hand electronic stuff and get a AMD Radeon RX 580 with around 100 USD. RX 580 is a cost-effective card to get 6 TFLOPS performance.

But, how to fit it with TensorFlow or Pytorch? CUDA does not agree with AMD GPUs. No worries, I have found ROCm for AMD GPUs to replace CUDA.

Requirements

It is so excited to run TensorFlow on AMD GPU. But here are some important notes:

  • Only new CPUs are supported as it requires PCIe Gen3 and PCIe Atomics
  • Only new GPUs are supported because old GPUs are too poor in performance
  • Use Linux with kernel 4.17 or above (Or you will have a hard time with it)

Supported CPUs

  • AMD Ryzen CPUs
  • The CPUs in AMD Ryzen APUs
  • AMD Ryzen Threadripper CPUs
  • AMD EPYC CPUs
  • Intel Xeon E7 v3 or newer CPUs
  • Intel Xeon E5 v3 or newer CPUs
  • Intel Xeon E3 v3 or newer CPUs
  • Intel Core i7 v4, Core i5 v4, Core i3 v4 or newer CPUs (i.e. Haswell family or newer)
  • Some Ivy Bridge-E systems

Refer to GitHub of ROCm CPU section. What are those “Some Ivy Bridge-E systems”? I don’t know too. You may Email them for support on that. You may see some older CPUs are limited supported, but I would suggest you don’t waste your time on that unless you want to contribute in ROCm to make it support older CPUs. It will make your life harder.

Supported GPUs

  • GFX8 GPUs
    • “Fiji” chips, such as on the AMD Radeon R9 Fury X and Radeon Instinct MI8
    • “Polaris 10” chips, such as on the AMD Radeon RX 580 and Radeon Instinct MI6
  • GFX9 GPUs
    • “Vega 10” chips, such as on the AMD Radeon RX Vega 64 and Radeon Instinct MI25
    • “Vega 7nm” chips, such as on the Radeon Instinct MI50, Radeon Instinct MI60 or AMD Radeon VII

Refer to GitHub of ROCm GPU section. Few GFX8 and GFX7 GPUs are supported unofficially (if you got problem, no help, no guarantee).

Install ROCm

Things I got

I got a i5-4570 for CPU (another 2nd hand computer with 140 USD) and RX 580 for GPU and installed Ubuntu Server 18.04.

The official tutorial will be just fine for installnig ROCm and TensorFlow. But you will encounter problem in Pytorch (which is the reason I write this tutorial, I gave up on the first time, and this time I find solution).

Install dependencies

Note the ROCm version you install, I am installing ROCm 3.3.0 This information will be useful for Pytorch installation.

Update system, install libnuma-dev and reboot:

1
2
3
4
5
6
7
$ sudo apt update

$ sudo apt dist-upgrade

$ sudo apt install libnuma-dev

$ sudo reboot

Install ROCm

Add the ROCm apt repository.

1
2
3
$ wget -q -O - http://repo.radeon.com/rocm/apt/debian/rocm.gpg.key | sudo apt-key add -

$ echo 'deb [arch=amd64] http://repo.radeon.com/rocm/apt/debian/ xenial main' | sudo te

Install ROCm

1
2
3
$ sudo apt update

$ sudo apt install rocm-dkms

Post installation

Grant yourself permission for accessing your GPU

1
$ sudo usermod -a -G video $LOGNAME

If you need to add more users, check the document

Reboot

1
$ sudo reboot

Test and Cofnigure

Test the ROCm installation.

1
2
$ /opt/rocm/bin/rocminfo
$ /opt/rocm/opencl/bin/x86_64/clinfo

You should see something like report.

Add ROCm to environment PATH:

1
2
$ echo 'export PATH=$PATH:/opt/rocm/bin:/opt/rocm/profiler/bin:/opt/rocm/opencl/bin/x86_64' |
> sudo tee -a /etc/profile.d/rocm.sh

Install TensorFlow

This is simple with two steps, get some important libraries and install TensorFlow through pip. Refer to ROCm Doc

1
2
3
4
5
6
7
$ sudo apt update

$ sudo apt install rocm-libs miopen-hip cxlactivitylogger rccl

$ sudo apt install wget python3-pip

$ pip3 install --user tensorflow-rocm

It now installed TensorFlow 2 (latest), you need to specify version if you need just like installing other packages in Python.

DONE

TensorFlow time~ (^_^)b
Raspberry Pi 化身 WiFi 蛋

前文

我們已經改造 Raspberry Pi 使用 4G 數據網路

目標

這次我們要讓 Raspberry Pi 將網絡分享給其他裝置,你可以選:

無線路由器

因為博主很懶惰,不想重複造輪子,所以無線路由器的教材就直接引用 Sixfab 的教學

如果你用的是早於 Raspberry Pi 3 的版本,你大概需要一個 USB 無線網路卡。

備份無線網絡配置

這並不是必須的步驟,不過萬一你日後想恢復原樣,這一步會很有幫助。

1
$ sudo cp /etc/wpa_supplicant/wpa_supplicant.conf /etc/wpa_supplicant/wpa_supplicant.backup.conf

配置無線網絡裝置

用以下指令清除舊配置

1
$ sudo cp /dev/null /etc/wpa_supplicant/wpa_supplicant.conf

將以下的新配置寫入到 /etc/wpa_supplicant/wpa_supplicant.conf

1
2
ctrl_interface=DIR=/var/run/wpa_supplicant GROUP=netdev
update_config=1

安裝 RaspAP

有一個簡單的安裝精靈 RaspAP 跟著它的步驟去進行安裝

1
$ wget -q https://git.io/voEUQ -O /tmp/raspap && bash /tmp/raspap -y

不過由於我本人並沒有試過這個方法,所以如果有任何疑問(例如默認的密碼、管理員界面等)還請前往 Sixfab 的教學原文教學(包含故障排除章節)

有線路由器

我自己是用的這個方法,因為感覺會比較安心,始終有線的網絡感覺會比較穩定。這一部分就要使用網絡位址轉換技術(Network Address Translation,NAT)來連接 ppp0eth0 兩個網絡界面(網卡)

我是參考將無線網絡分享到網線教程然後將它改成將 PPP 網絡分享到網線

DHCP 和 DNS 伺服器

你可以選自己喜歡的諸如 isc-dhcp-server 之類比較複雜的,這邊直接用 dnsmasq 比較方便

1
$ sudo apt-get install dnsmasq

設置數據包轉發

編輯 /etc/sysctl.conf 裡的 #net.ipv4.ip_forwarding=1

1
$ sudo nano /etc/sysctl.conf

移除#,將這行文字變成net.ipv4.ip_forwarding=1。這樣下次開機的時候就會啟用數據包轉發。

設置網絡界面

編輯 /etc/network/interfaces 裡的 eth0 部分

1
2
3
4
5
6
allow-hotplug eth0  
iface eth0 inet static
address 192.168.2.1
netmask 255.255.255.0
network 192.168.2.0
broadcast 192.168.2.255

設置 dnsmasq

先備份一下 dnsmasq 原本的設置

1
$ sudo mv /etc/dnsmasq.conf /etc/dnsmasq.conf.orig

然後編輯 /etc/dnsmasq.conf

1
2
3
4
5
6
7
8
9
10
11
interface=eth0      # 分享到 eth0  
listen-address=192.168.2.1 # 和/etc/network/interfaces配置的 IP 要一致
# Bind to the interface to make sure we aren't sending things elsewhere
#### bind-interfaces #### BUT don't enable this.
server=8.8.8.8 # Forward DNS requests to Google DNS
domain-needed # Don't forward short names
# Never forward addresses in the non-routed address spaces.
bogus-priv
# Assign IP addresses between 192.168.2.2 and 192.168.2.100 with a
# 12 hour lease time
dhcp-range=192.168.2.2,192.168.2.100,12h

關於 bind-interfaces 部分,原本的教學是啟用的,不過我這邊啟用的話會無法分享網絡,所以這邊用#註釋掉了

設置 NAT

通過防火牆來設置 NAT

1
2
3
$ sudo iptables -t nat -A POSTROUTING -o wwan0 -j MASQUERADE  
$ sudo iptables -A FORWARD -i wwan0 -o eth0 -m state --state RELATED,ESTABLISHED -j ACCEPT
$ sudo iptables -A FORWARD -i eth0 -o wwan0 -j ACCEPT

設置為永久 NAT

保存設置

1
$ sudo sh -c "iptables-save > /etc/iptables.ipv4.nat"

修改 /etc/rc.local 開機自動載入 NAT 設置

1
2
# Add this line above exit 0
iptables-restore < /etc/iptables.ipv4.nat

完成

將手提電腦連上 Raspberry Pi 然後……可以了

1
2
3
4
5
$ ping 8.8.8.8
PING 8.8.8.8 (8.8.8.8) 56(84) bytes of data.
64 bytes from 8.8.8.8: icmp_seq=2 ttl=51 time=99.2 ms
64 bytes from 8.8.8.8: icmp_seq=1 ttl=51 time=22.9 ms
64 bytes from 8.8.8.8: icmp_seq=3 ttl=51 time=69.7 ms

Video based Motion Detection in Python with OpenCV

Demo

I added 30 seconds buffer before the scipt start recording so we can see the green color indicates the detected movements.

What you need

  • A Webcam
  • Python and pip

Requirements.txt

1
2
opencv-python
numpy

Goal

To implement a security camera auto record videos when some thing moves in the view port.

Source code

The original implementation was in Python 2.x with OpenCV 3.x

I fork it to Python 3.x and make it compatible with OpenCV 4.x

The MotionDetectorContours.py and MotionDetector.py results the same in the original implementation. But they give different result in my implementation, I guess it is because I skiped cv.Erode() in MotionDetectorContours.py.

The original implementation

There are two implementation according to the developer.

Simple way

  1. Receive frames and send to process in run()
  2. processImage() calculate difference of pixels in frames
  3. If number of different pixels exceed the threshold, somethingHasMoved() return True
  4. run() enable recording if somethingHasMoved() return True

Smart way

  1. Receive frames and send to process in run()
  2. processImage() calculate difference of areas in frames with cv2.findContours()
  3. If change of area in comparing to total area exceed the threshold, somethingHasMoved() return True
  4. run() enable recording if somethingHasMoved() return True

Our implementation

Our implementation will be based on MotionDetectorContours.py. It did better job for me and it can catch my eye blinking.

Import OpenCV for image processing, Numpy for replacing cv2.CreateImage(), datetime and tmie for showing video recording time.

1
2
3
4
import cv2 as cv
import numpy as np
from datetime import datetime
import time

Define a class for image processing and maintain the loop of reading frames.

1
2
3
4
5
6
7
8
9
10
11
12
13
14
15
16
17
18
class MotionDetectorAdaptative():
def onChange(self, val): #callback when the user change the detection threshold
pass

def __init__(self,threshold=25, doRecord=True, showWindows=True):
pass

def initRecorder(self): #Create the recorder
pass

def run(self):
pass

def processImage(self, curframe):
pass

def somethingHasMoved(self):
pass

The initializatoin:

1
2
3
4
5
6
7
8
9
10
11
12
13
14
15
16
17
18
19
20
21
22
23
24
25
26
27
def __init__(self,threshold=25, doRecord=True, showWindows=True):
self.writer = None
self.font = None
self.doRecord=doRecord #Either or not record the moving object
self.show = showWindows #Either or not show the 2 windows
self.frame = None

self.capture=cv.VideoCapture(0)
self.frame = self.capture.read()[1] #Take a frame to init recorder
if doRecord:
self.initRecorder()

self.absdiff_frame = None
self.previous_frame = None

self.surface = self.frame.shape[0] * self.frame.shape[1]
self.currentsurface = 0
self.currentcontours = None
self.threshold = threshold
self.isRecording = False
self.trigger_time = 0 #Hold timestamp of the last detection
self.es = cv.getStructuringElement(cv.MORPH_ELLIPSE, (9,4))

if showWindows:
cv.namedWindow("Image")
# for user to change threshold in runtime
cv.createTrackbar("Detection treshold: ", "Image", self.threshold, 100, self.onChange)

run() will maintain the loop to:

  1. read frame
  2. pass to processImage()
  3. check if anything moved in somethingHasMoved(), isRecording = True if things moved
  4. if isRecording == True a video recorder will be activated
  5. draw area of moved/changed to frame and display it on screen
  6. repeat the steps if Esc was not pressed
1
2
3
4
5
6
7
8
9
10
11
12
13
14
15
16
17
18
19
20
21
22
23
24
25
26
27
28
29
30
31
def run(self):
started = time.time()
while True:

currentframe = self.capture.read()[1]
instant = time.time() #Get timestamp o the frame

self.processImage(currentframe) #Process the image

if not self.isRecording:
if self.somethingHasMoved():
self.trigger_time = instant #Update the trigger_time
if instant > started +10:#Wait 5 second after the webcam start for luminosity adjusting etc..
print("Something is moving !")
if self.doRecord: #set isRecording=True only if we record a video
self.isRecording = True
currentframe = cv.drawContours(currentframe, self.currentcontours, -1, (0, 255, 0), cv.FILLED)
else:
if instant >= self.trigger_time +10: #Record during 10 seconds
print("Stop recording")
self.isRecording = False
else:
cv.putText(currentframe,datetime.now().strftime("%b %d, %H:%M:%S"), (25,30),self.font, 1, (255, 0, 0), 2, cv.LINE_AA) #Put date on the frame
self.writer.write(currentframe) #Write the frame

if self.show:
cv.imshow("Image", currentframe)

c=cv.waitKey(1) % 0x100
if c==27 or c == 10: #Break if user enters 'Esc'.
break

Find the change between frames and do simple feature extraction, result saved to self.gray_frame.

1
2
3
4
5
6
7
8
9
10
11
12
13
14
15
16
17
18
19
def processImage(self, curframe):
curframe = cv.GaussianBlur(curframe, (21,21), 0) #Remove false positives

if self.absdiff_frame is None: #For the first time put values in difference, temp and moving_average
self.absdiff_frame = curframe.copy()
self.previous_frame = curframe.copy()
self.average_frame = np.float32(curframe) #Should convert because after runningavg take 32F pictures
else:
cv.accumulateWeighted(curframe, self.average_frame, 0.05) #Compute the average

self.previous_frame = self.average_frame.astype(np.uint8) #Convert back to 8U frame

self.absdiff_frame = cv.absdiff(curframe, self.previous_frame) # moving_average - curframe

self.gray_frame = cv.cvtColor(self.absdiff_frame, cv.COLOR_BGR2GRAY) #Convert to gray otherwise can't do threshold
self.gray_frame = cv.threshold(self.gray_frame, 5, 255, cv.THRESH_BINARY)[1]

self.gray_frame = cv.dilate(self.gray_frame, self.es) #to get object blobs
# cv.Erode(self.gray_frame, self.gray_frame, None, 10)

Find the area of changes and compare to threshold over the whole area:

1
2
3
4
5
6
7
8
9
10
11
12
13
14
15
16
def somethingHasMoved(self):

# Find contours, ignore other return values (image, contours, hierarchy)[1]
contours = cv.findContours(self.gray_frame, cv.RETR_EXTERNAL, cv.CHAIN_APPROX_SIMPLE)[1]

self.currentcontours = contours #Save contours

self.currentsurface = sum([cv.contourArea(c) for c in contours]) #For all contours compute the area

avg = (self.currentsurface*100)/self.surface #Calculate the average of contour area on the total size
self.currentsurface = 0 #Put back the current surface to 0

if avg > self.threshold:
return True
else:
return False

If user change threshold during runtime, onChange() method in the class will be triggered:

1
2
def onChange(self, val): #callback when the user change the detection threshold
self.threshold = val

Declare a video recorder writes frame to video file:

1
2
3
4
5
def initRecorder(self): #Create the recorder
codec = cv.VideoWriter_fourcc('M', 'J', 'P', 'G')
self.writer=cv.VideoWriter(datetime.now().strftime("%b-%d_%H_%M_%S")+".wmv", codec, 5, self.frame.shape[1::-1], 1)
#FPS set to 5 because it seems to be the fps of my cam but should be ajusted to your needs
self.font = cv.FONT_HERSHEY_SIMPLEX #Creates a font

Let’s try it.

1
2
3
if __name__=="__main__":
detect = MotionDetectorAdaptative(threshold=5, doRecord=True)
detect.run()

Improvements

There is a problem the video only record for 10 seconds. Base on MotionDetectorContours.py modify its condition to end recording:

1
if instant >= self.trigger_time +10 and not self.somethingHasMoved(): #Record until move stop 10 seconds

We can add an Email notification in this. You may refer to the tutorial sending Email notification for network usage report. And we can then combine it with Raspberry Pi to build a security camera.

You will need these things for a Raspberry Pi security camera:

If you ask, I used a wide angle camera

Sixfab has a tutorial about Raspberry Pi Security System with Sixfab 3G, 4G/LTE Base Shield. It seem to use a motion sensor to detect moment in the area and activate camera when sensor detect movement, it then send a frame to a email specified in the Python script.

I didn’t find the hardware list of their design, but the Python source code is here.

I think using a motion sensor is a good idea, Docker Pi Series of Sensor Hub seem to be a good option, considering to have it in my production environment.

Raspberry Pi 使用 4G 數據網路

購物清單

不想分開購買零件,可以購買 Sixfab 的 Raspberry Pi 4G/LTE套件

組裝

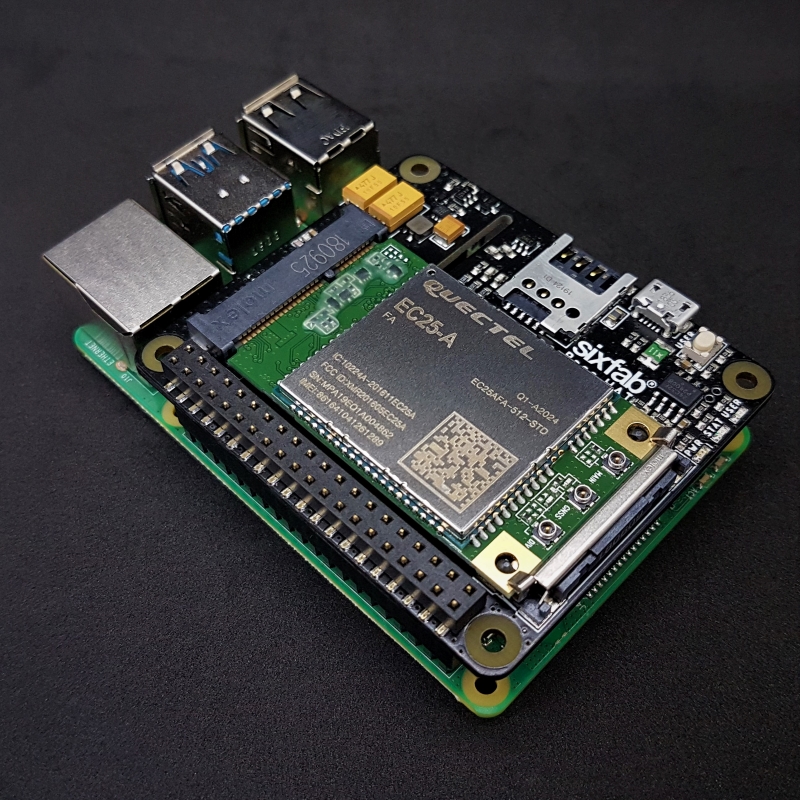
  1. 安裝 Mini PCIe 4G IoT Module 到 3G/4G-LTE Base HAT,感覺和以前在手提電腦上安裝記憶體差不多。

  2. 然後將 3G/4G-LTE Base HAT 裝上 Raspberry Pi。
    Installed onto Pi

    完成之後大概這樣的感覺(圖片來源:@sixfab

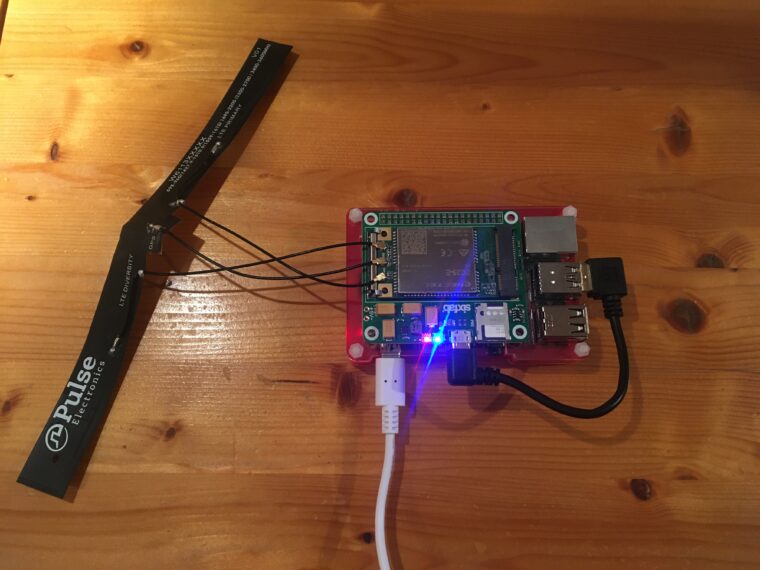
  3. 將天線也安裝上去,正確地完成安裝之後的樣子大概這樣
    Connect Antenna

    加上天線應該這樣個樣子吧(圖片來源:@torbox.ch

最左邊和最右邊的兩個天線似乎是可以互換的,我安裝完成之後那些線是平行的。

安裝驅動

Sixfab 提供了兩種方法驅動 LTE 模組,一個是 PPP 一個是 QMI interface。這邊我用的是 PPP。

在 Raspberry Pi 的終端模擬器裡進行操作,下載 sixfab 的安裝腳本,然後跟著指引進行安裝就可以了。簡單方便快捷,感謝sixfab。

1
2
3
4
5
$ wget https://raw.githubusercontent.com/sixfab/Sixfab_PPP_Installer/master/ppp_installer/install.sh

$ chmod +x install.sh

$ sudo ./install.sh

有些選項可能比較曖昧,給個避坑指南

  • Choose your Sixfab
    • 因為買的是 3G, 4G/LTE Base Shield 所以只填 2
    • 就算之後連不上也肯定不是這裡填錯
  • APN
    • 問問谷歌、雅虎或者百度你這家電信商的基地台用什麼存取點名稱(APN),選一個填,不對之後再改
    • 將你的 SIM 卡插入智能電話,看看設定裡行動網絡設定關於存取點名稱裡有什麼選項,選一個填,不對之後再改
    • 之後修改的方法參見出坑指南
  • PORT name
    • 因為買的是 3G, 4G/LTE Base Shield 所以只填 ttyUSB3
    • 肯定是 ttyUSB3,跟實際上你硬件上插哪個 USB 位置好像沒關係,可能是用的 GPIO?

沒能避開坑?出坑指南

我需要登入才能上網

如果你需要用戶名和密碼登入才能上網,完成前面的安裝和設定之後再編輯 /etc/ppp/peers/provider 檔案。

你要移除這一行

1
noauth

然後按照以下格式填入登錄資料

1
2
user "YOUR USERNAME"
password "YOURPASSWORD"

遇到 Routing error 的錯誤

執行以下指令

1
2
3
$ sudo route del default

$ sudo route add default ppp0

沒有網絡連接

誰也 ping 不到,網絡不通,或者無盡的連接超時

1
2
3
4
5
$ ping 8.8.8.8
connect: network is unreachable
$ ping baidu.com
connect: network is unreachable
`

檢查你的移動數據是否需要先在手機上啟用

試試手動連接移動數據

1
$ sudo pon

你可能發現 Modem hang up 並且不論你做什麼都沒有什麼效果。

我已經坑過幾次了,基本上問題就是 APN 填錯了,或者舊的 APN 已經不能用了。於是我將 SIM 插入手機,看手機自動連上網絡的時候用的哪個 APN 再修改 /etc/ppp/peers/provider 文件

1
2
$ sudo poff
$ sudo nano /etc/ppp/peers/provider

APN 在我 /etc/ppp/peers/provider 文件裡第三行的結尾。

逐一測試你所能找到的 APN,看看 sudo pon 能不能連上,應該其中一個能連上。至少我是成功了。

DONE

1
2
3
4
5
$ ping 8.8.8.8
PING 8.8.8.8 (8.8.8.8) 56(84) bytes of data.
64 bytes from 8.8.8.8: icmp_seq=1 ttl=52 time=20.9 ms
64 bytes from 8.8.8.8: icmp_seq=2 ttl=52 time=111 ms
64 bytes from 8.8.8.8: icmp_seq=3 ttl=52 time=69.7 ms

Network usage monitor using Python

Previous

We have built a 4G/LTE router but how do I know its network usage? How much will it cost me?

Goal

We are now going to write a Python script to send Email notificatoin for network usage and set a threshold for it.

I assume you know the basic pattern how to code in Python

Requirements.txt

1
2
3
psutil
python_http_client
sendgrid

You can install them by typing in terminal:

1
$ pip3 install psutil python_http_client sendgrid

You may need to specify pip3 in Raspbian as both Python 2.x and Python 3.x were installed.

Coding Python

1
2
3
$ mkdir network-monitor
$ cd network-monitor
$ nano monitor.py

And then we start coding

Get network usage

1
2
3
4
5
6
7
8
import psutil

NETWORK_INTERFACE = 'ppp0'

netio = psutil.net_io_counters(pernic=True)
net_usage = netio[NETWORK_INTERFACE].bytes_sent + netio[NETWORK_INTERFACE].bytes_recv

print(net_usage, "bytes")

It will show you how many bytes it has transfered for upload and download.

If it shows zero, change NETWORK_INTERFACE to wwan0.

Set threshold

1
2
3
4
5
6
7
8
9
10
11
12
13
import psutil

NETWORK_INTERFACE = 'wwan0'
NETWORK_LIMIT = 5000000 # 5GB in SI standard

while True:
netio = psutil.net_io_counters(pernic=True)
net_usage = netio[NETWORK_INTERFACE].bytes_sent + netio[NETWORK_INTERFACE].bytes_recv

if net_usage > NETWORK_LIMIT:
print("Meets network limit!")

print(net_usage, "bytes has been used")

Once it over the NETWORK_LIMIT it will print a lot of lines of “Meets network limit!”. We can add a timer to check the network limit every X second.

Separate the config and code

Try to separate the cnofiguratoin and the Python script so we can reuse this project on other devices.

configparser is really a good helper on this.

Create a file monitor.conf

1
2
3
4
5
6
7
8
9
10
11
12
[Email]
SENDGRID_API_KEY = Your.Keyfrom_SendGrid
from = helper@raspberry.pi
to = your@email.address
subject = From your Raspberry Pi

[Network]
INTERFACE = wwan0
LIMIT = 45000000000

[Misc]
TIME_INTER = 36

Now we can load the configuration in Python

1
2
3
4
5
6
7
8
9
10
11
12
13
14
15
16
17
18
19
20
21
import time
import psutil
import configparser
config = configparser.ConfigParser()
config.optionxform = str #reference: http://docs.python.org/library/configparser.html
config.read('monitor.conf')

NETWORK_INTERFACE = config.get('Network', 'INTERFACE') # Define interface to check
NETWORK_LIMIT = int(config.get('Network', 'LIMIT')) # Define network limit
SENDGRID_API_KEY = config.get('Email', 'SENDGRID_API_KEY') # Define the API key for SendGrid
TIME_INTER = config.get('Misc', 'TIME_INTER') # Define time interval 36 seconds

while True:
time.sleep(TIME_INTER) # Check every 36 seconds
netio = psutil.net_io_counters(pernic=True)
net_usage = netio[NETWORK_INTERFACE].bytes_sent + netio[NETWORK_INTERFACE].bytes_recv

if net_usage > NETWORK_LIMIT:
print("Meets network limit!")

print(net_usage, "bytes has been used")

Prepare for the Email

We use SendGrid to send the Email notification in this tutorial.

You may need to sign up on SendGrid. I choose it because of 100 free email quota every day.

Generate SendGrid API Key

The option is in Setting -> API Keys -> Create API Key Creating an API key

Copy the Key and paste to monitor.conf

1
2
[Email]
SENDGRID_API_KEY = Your.Keyfrom_SendGrid

Write python script

Refer to their official guide SendGrid GitHub repo

1
2
3
4
import time
import psutil
import sendgrid
from sendgrid.helpers.mail import *

Read the monitor.conf

1
2
3
4
5
6
7
8
9
10
import configparser
config = configparser.ConfigParser()
config.optionxform = str #reference: http://docs.python.org/library/configparser.html
config.read('netio-mon.conf')

NETWORK_INTERFACE = config.get('Network', 'INTERFACE')
NETWORK_LIMIT = int(config.get('Network', 'LIMIT'))
NETWORK_MAX = int(config.get('Network', 'MAX'))
SENDGRID_API_KEY = config.get('Email', 'SENDGRID_API_KEY')
TIME_INTER = config.get('Misc', 'TIME_INTER')

I would like to have some loggings too so I added this line

1
2
3
4
5
6
7
8
import logging

loggingFile = logging.FileHandler('my.log', 'w', 'utf-8')

logging.basicConfig(level=logging.DEBUG,
format='%(asctime)s %(levelname)s %(message)s',
datefmt='%Y-%m-%d %H:%M',
handlers=[loggingFile, ])

Declare two methods for sending Email

1
2
3
4
5
6
7
8
9
10
11
def create_message(sender, to, subject, message_text):
logging.info("send email::" + message_text)
from_email = Email(sender)
to_email = To(to)
subject = subject
content = Content("text/plain", message_text)
return Mail(from_email, to_email, subject, content)


def send_message(service, message):
return service.client.mail.send.post(request_body=message.get())

Now the mean loop to check the network usage periodically.

1
2
3
4
5
6
7
8
9
10
11
12
13
14
15
16
17
18
# Initialize the SendGrid API
service = sendgrid.SendGridAPIClient(api_key=SENDGRID_API_KEY)

# A flag to make sure only send one notification
have_sent = False

while True:
time.sleep(TIME_INTER)
netio = psutil.net_io_counters(pernic=True)
net_usage = netio[NETWORK_INTERFACE].bytes_sent + netio[NETWORK_INTERFACE].bytes_recv
if net_usage > NETWORK_LIMIT and not have_sent:
message = create_message(
config.get('Email', 'from'),
config.get('Email', 'to'),
config.get('Email', 'subject'),
'The network have used %s bytes' %net_usage)
send_message(service, message)
have_sent = True

Improvement

  • Prevent network usage lost, save the usage in the last email with pickle
  • In order to monitoring network usage continuously, set one more NETWORK_MAX for reseting the flag after first email notification
    See my GitHub Repo

Raspberry Pi connect to 4G LTE

What you need

Alternative option: Raspberry Pi 4G/LTE HAT Kit from Sixfab

Assembly

  1. Install Mini PCIe 4G IoT Module on Raspberry Pi 3G/4G-LTE Base HAT, it is similar to installing RAM modules in laptop.

  2. Install Raspberry Pi 3G/4G-LTE Base HAT on Raspberry, it is simple.
    Installed onto Pi

    After assembly Raspberry Pi @sixfab

  3. Connect the Antenna to the Raspberry Pi 3G/4G-LTE Base HAT, the wire should be parallel if you connect them to right port.
    Connect Antenna

    Complete assembly @torbox.ch

The function of two outermost cable seem to be identical, all Antenna cables are parallel in my assembly and it works well.

Driver

Sixfab provides two methods to control the LTE module, PPP and QMI interface.

I used PPP connection here.

1
2
3
4
5
$ wget https://raw.githubusercontent.com/sixfab/Sixfab_PPP_Installer/master/ppp_installer/install.sh

$ chmod +x install.sh

$ sudo ./install.sh

Few options confused me and here are tips:

  • Choose your Sixfab
    • Always 2 for the 3G, 4G/LTE Base Shield (Compatible with 6 option for Raspberry Pi 3G/4G&LTE Base HAT)
  • APN
    • Google the APN for the service provider
    • Or insert the SIM Card to a phone and view the APN in settings
  • PORT name
    • For 3G, 4G/LTE Base Shield && Base HAT it will be ttyUSB3
    • Always ttyUSB3, no thing to do with physical port

Troubleshooting

Need auth option in setup

If your service provider need username/password to use the network, edit /etc/ppp/peers/provider later to add your username and password.
Remove line

1
noauth

And add two lines

1
2
user "YOUR USERNAME"
password "YOURPASSWORD"

Routing error

In this case, run the following commands

1
2
3
$ sudo route del default

$ sudo route add default ppp0

No network

Try manually connect to cellular network:

1
$ sudo pon

Modem hang up and you tried all solution, nothing work and do not know why

I have encountered few time on this problem, it hang up while connecting to network.
Because of incorrect APN, try all APN you can find on network and in your phone’s setting. To change the APN, edit /etc/ppp/peers/provider

1
2
$ sudo poff
$ sudo nano /etc/ppp/peers/provider

The APN is on the end of the 3rd line in my /etc/ppp/peers/provider.

Try every APN you can find for the service provider try connect with sudo pon and one of them should work.

DONE

1
2
3
4
5
$ ping 8.8.8.8
PING 8.8.8.8 (8.8.8.8) 56(84) bytes of data.
64 bytes from 8.8.8.8: icmp_seq=1 ttl=52 time=20.9 ms
64 bytes from 8.8.8.8: icmp_seq=2 ttl=52 time=111 ms
64 bytes from 8.8.8.8: icmp_seq=3 ttl=52 time=69.7 ms

Raspberry Pi as 4G LTE Router

Previous

We have established connection to 4G LTE network

Goal

We are going to turn the Raspberry Pi into a Router for our devices, pick your need:

Wireless Router

Instead of reinventing the wheel, we follow the guide Sixfab tutorial

If you are using Raspberry Pi 2 or earlier, you will need a USB WiFi adaptor.

Backup wireless configurations

Not a must but you may want to do this, in case later you changed your mind.

1
$ sudo cp /etc/wpa_supplicant/wpa_supplicant.conf /etc/wpa_supplicant/wpa_supplicant.backup.conf

Configure wireless device

Clear the configuration file

1
$ sudo cp /dev/null /etc/wpa_supplicant/wpa_supplicant.conf

Add configurations into /etc/wpa_supplicant/wpa_supplicant.conf:

1
2
ctrl_interface=DIR=/var/run/wpa_supplicant GROUP=netdev
update_config=1

Install RaspAP

Use a quick installer of RaspAP and follow the questions to setup the wireless network

1
$ wget -q https://git.io/voEUQ -O /tmp/raspap && bash /tmp/raspap -y

I did not tested this, so any problem or question (default password etc.), please refer to the Sixfab tutorial and the toubleshooting in the original tutorial

Wired Router

We are going to use network address translation (NAT) to bridge ppp0 with eth0

This tutorial was adopting sharing wifi through the ethernet and change it to share PPP connection to ethernet

DHCP and DNS server

I used dnsmasq for DHCP + DNS.

1
$ sudo apt-get install dnsmasq

Configurate interfaces

Edit the eth0 section in file /etc/network/interfaces:

1
2
3
4
5
6
allow-hotplug eth0  
iface eth0 inet static
address 192.168.2.1
netmask 255.255.255.0
network 192.168.2.0
broadcast 192.168.2.255

Configure forwarding

Edit /etc/sysctl.conf to enable packet forwarding.

1
$ sudo nano /etc/sysctl.conf

Find the line #net.ipv4.ip_forwarding=1 and remove the # at the beginning to make it net.ipv4.ip_forwarding=1. This will enable packet forwarding once the system reboot.

Configure dnsmasq

Backup dnsmasq configuration

1
$ sudo mv /etc/dnsmasq.conf /etc/dnsmasq.conf.orig

Edit /etc/dnsmasq.conf

1
2
3
4
5
6
7
8
9
10
11
interface=eth0      # Use interface eth0  
listen-address=192.168.2.1 # listen on
# Bind to the interface to make sure we aren't sending things elsewhere
#### bind-interfaces #### BUT don't enable this.
server=8.8.8.8 # Forward DNS requests to Google DNS
domain-needed # Don't forward short names
# Never forward addresses in the non-routed address spaces.
bogus-priv
# Assign IP addresses between 192.168.2.2 and 192.168.2.100 with a
# 12 hour lease time
dhcp-range=192.168.2.2,192.168.2.100,12h

Enable bind-interfaces cause me unable to share the internet. You may need to test it.

NAT configuration

1
2
3
$ sudo iptables -t nat -A POSTROUTING -o wwan0 -j MASQUERADE  
$ sudo iptables -A FORWARD -i wwan0 -o eth0 -m state --state RELATED,ESTABLISHED -j ACCEPT
$ sudo iptables -A FORWARD -i eth0 -o wwan0 -j ACCEPT

Make the rules persistent.

1
$ sudo sh -c "iptables-save > /etc/iptables.ipv4.nat"

Edit /etc/rc.local

1
2
# Add this line above exit 0
iptables-restore < /etc/iptables.ipv4.nat

DONE

Connect my laptop to Raspberry Pi

1
2
3
4
5
$ ping 8.8.8.8
PING 8.8.8.8 (8.8.8.8) 56(84) bytes of data.
64 bytes from 8.8.8.8: icmp_seq=2 ttl=51 time=99.2 ms
64 bytes from 8.8.8.8: icmp_seq=1 ttl=51 time=22.9 ms
64 bytes from 8.8.8.8: icmp_seq=3 ttl=51 time=69.7 ms

Hello World

Welcome to Hexo! This is your very first post. Check documentation for more info. If you get any problems when using Hexo, you can find the answer in troubleshooting or you can ask me on GitHub.

Quick Start

Create a new post

1
$ hexo new "My New Post"

More info: Writing

Run server

1
$ hexo server

More info: Server

Generate static files

1
$ hexo generate

More info: Generating

Deploy to remote sites

1
$ hexo deploy

More info: Deployment