YoloV5 Wheelchair detector

YoloV5 Wheelchair detector

YoloV5 is a object detection model implemented with Pytorch and inspired by Darknet YOLO models, which is not officially a member of YOLO family. I am interested in trying it, and the detectors I found on the home page of the mobility aids dataset are mainly R-CNN based models, therefore I decided to do it in different approach with YoloV5.

⚠ This dataset is provided for research purposes only. Any commercial use is prohibited.

1
2
3
4
5
6
7
8
@INPROCEEDINGS{vasquez17ecmr,
author = {Andres Vasquez and Marina Kollmitz and Andreas Eitel and Wolfram Burgard},
title = {Deep Detection of People and their Mobility Aids for a Hospital Robot},
booktitle = {Proc.~of the IEEE Eur.~Conf.~on Mobile Robotics (ECMR)},
year = {2017},
doi = {10.1109/ECMR.2017.8098665},
url = {http://ais.informatik.uni-freiburg.de/publications/papers/vasquez17ecmr.pdf}
}

Download YoloV5

You can find YoloV5 here: https://github.com/ultralytics/yolov5

You may clone the source code like me

1
git clone https://github.com/ultralytics/yolov5.git

Or you can use the docker image which includes the source code

1
docker run --gpus all --rm -v "$(pwd)":/root/runs --ipc=host -it ultralytics/yolov5:latest

I don’t keep a lots of docker containers, so I added --rm to remove the container after I quit it. You may want to keep the container for more training later, then remove the option --rm from the above line.

I also mounted current working directory into /root/runs with option -v "$(pwd)":/root/runs so the training/inference result will output to current working directory outside the docker container. You may change it base on your needs.

For more help on using docker, read Docker run reference.

Download Dataset

I saw a folder called data in the root path of the YoloV5 project, and I decided to use it for dataset. You may save the dataset to anywhere you like, but remember to change my code converting Pascal format annotation to Yolo format annotation.

Now I assume you are in the docker container. Change directory into the data/ folder under the YoloV5 project.

1
cd data

Download images and unzip to images/train/ then remove the zip file

1
2
curl -L http://mobility-aids.informatik.uni-freiburg.de/dataset/Images_RGB.zip -o Images_RGB.zip
unzip -q Images_RGB.zip -d "images/train" && rm Images_RGB.zip

Download labels (training) and unzip to labels/train then remove the zip file

1
2
curl -L http://mobility-aids.informatik.uni-freiburg.de/dataset/Annotations_RGB.zip -o Annotations_RGB.zip
unzip -q Annotations_RGB.zip -d "labels/train" && rm Annotations_RGB.zip

Download labels (testing) and unzip to labels/test then remove the zip file

1
2
curl -L http://mobility-aids.informatik.uni-freiburg.de/dataset/Annotations_RGB_TestSet2.zip -o Annotations_RGB_TestSet2.zip
unzip -q Annotations_RGB_TestSet2.zip -d "labels/test" && rm Annotations_RGB_TestSet2.zip

You may also download it with browser from the home page of the mobility aids dataset if you are not using docker or mounting a directory for dataset.

Prepare dataset

Dataset split

We need to split the images into training and testing sets. I wrote a script for this base on the name of labels to find the images of training set labels and testing set labels.

As you were in data/ directory, type python and paste the following script should do the job. Or you may also create a python script file and paste the script into it and then run the script.

1
2
3
4
5
6
7
8
9
10
11
12
13
14
import os
from glob import glob

image_list = glob('images/**/*.png')
test_list = [os.path.basename(file)[:-4] for file in glob('labels/test/*.yml')]

if not os.path.exists('images/test'):
os.makedirs('images/test')


for filepath in image_list:
filename = os.path.basename(filepath)
if filename[:-4] in test_list:
os.rename(filepath, 'images/test/' + filename)

Now we have the images ready.

Label conversion

The labels are YAML format, we need to convert it into text file with label center_x center_y width height. My script for doing this requires modules yaml for parsing YAML files and tqdm to see the progress.

Install script dependencies

1
pip install yaml tqdm

Here you go my script, convert the YAML to text file and remove YAML file

1
2
3
4
5
6
7
8
9
10
11
12
13
14
15
16
17
18
19
20
21
22
23
24
25
26
27
28
29
30
31
32
33
34
35
36
37
38
39
40
41
42
43
44
45
46
47
48
49
50
51
import os
from glob import glob
import yaml
from tqdm import tqdm

labels = ['person', 'wheelchair', 'push_wheelchair', 'crutches', 'walking_frame']

yaml_list = glob('labels/train/*.yml') + glob('labels/test/*.yml')

for filepath in tqdm(yaml_list):
label_list = []
with open(filepath) as f:
data = yaml.full_load(f)
annotation = data['annotation']
if 'object' in annotation:
object_list= annotation['object']
area_width = int(annotation['size']['width'])
area_height= int(annotation['size']['height'])
for obj in object_list:
label = labels.index(obj['name'])
bndbox = obj['bndbox']
min_x = int(bndbox['xmin'])
max_x = int(bndbox['xmax'])
min_y = int(bndbox['ymin'])
max_y = int(bndbox['ymax'])

center_x = (max_x + min_x) // 2
center_y = (max_y + min_y) // 2
width = max_x - min_x
height= max_y - min_y

label_list.append([
label,
center_x / area_width,
center_y / area_height,
width / area_width,
height/ area_height
])

savepath = filepath.replace('.yml', '.txt')
with open(savepath, 'w') as f:
start_new_line = False
for label_line in label_list:
if start_new_line:
f.write("\n")
else:
start_new_line = True
label, x_center, y_center, width, height = label_line
f.write(f"{label} {x_center} {y_center} {width} {height}")

os.remove(filepath)

You may want to verify the name of labels in YAML file before you run the script and remove the YAML files. Just in case labels = ['person', 'wheelchair', 'push_wheelchair', 'crutches', 'walking_frame'] does not match with the name of objects in YAML files and make your model useless.

Add dataset to YoloV5

As you may see the commmand to start training of YoloV5 look like this: python train.py --data voc.yaml

That means there is a file called voc.yaml in data/ directory contain the path of images and labels. Therefore to add our dataset, we need to create a YAML file in data/.

If you follow my instructions then the path should be the same as mine, otherwise you should edit the path to your dataset.

1
2
3
4
5
6
7
8
9
10
11
12
13
# Mobility Aids Dataset
# Train command: python train.py --data mobility_aids.yaml


# train and val data as 1) directory: path/images/, 2) file: path/images.txt, or 3) list: [path1/images/, path2/images/]
train: data/images/train
val: data/images/test

# number of classes
nc: 5

# class names
names: [ 'person', 'wheelchair', 'push_wheelchair', 'crutches', 'walking_frame']

Now you should be ready for training.

Train

1
python train.py --data mobility_aids.yaml

Now… Wait…

funny meme

After few hours, I finished the training on 2080 Ti.

I forgot to record the result, I guess it was around 0.8 for mAP. Anyway it does not work well for videos of wheelchair on street. I guess it is because dataset was indoor environment, does not fit with outdoor environment = My bad.
Why GPT works

GPT == DNN == approximation

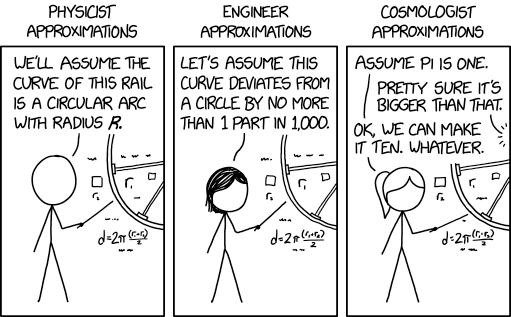
Types of Approximation

Types of Approximation from xkcd

Deep learning is a hot topic in recent years, there are a lot of articles explaining its principle in mathematics.

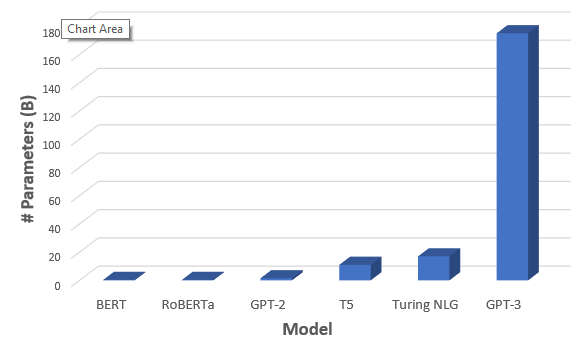
OpenAI released language generator GPT-3 shows us artificial intelligence in deep learning can behave in similar way as humans do. It can ask question, answer question and write articles that make us believe it will pass the turing test.

Now a question pops up

170 billion parameters == human brain??

Some people ask.

The Answer

No.

Well, it behaves like human brain but it is not the same.

To explain why it works, we need to know GPT is using deep learning technology which do approximations. So what does GPT-3 approximates to?

Remember earlier we talked about how game theory works? Game thory approximates the choice of action without consider the complex thinking inside human brain. Now, what does GPTs approximate to? Choice of words.

Choice of words?

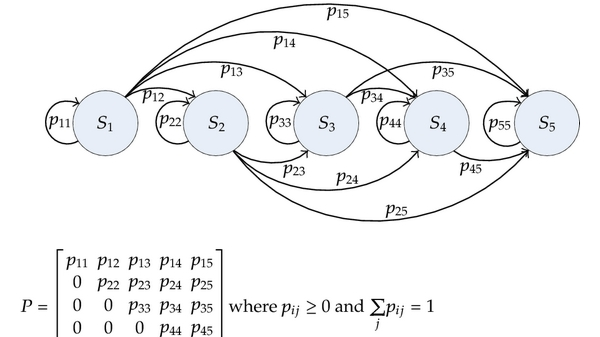
That reminds us of Markov Chain.

Markov Chain Illustration

More about markov chain

It behaves and works in a similar way. except there is no “word” for GPT-3, words are mapped into vectors. Thanks to Word2Vec, words are transformed into vectors in continuous latent space.

Word2Vec

Demo of Word2Vec @Rstudio

With the latent space, GPT-3 can have more than one direction for the choice of words while Markov chain is in single direction.

GPT-3 do not know what it says

Some one gave GPT-3 a turing test.

We can see that GPT-3 is capable of organizing words in a way humans do, but it does not think with logics. Not today I guess.

Short conclusion

  1. Texts are formed with symbols.

  2. Symbols used in text are limited.

  3. GPTs try to approximate the choice of words when presenting idea.

    The idea is in the form of other texts composed with countable set of symbols.
    Which means it does transform from text to another. I guess this is why language models are also called “transformer”.

It is similar to game theory, we simplify human behaviour with matrices and payoffs as whatever complex one thinks, there are limited actions one can take in the game. So we can simplify the thinking and approximate human behaviour.

And by the way, people don’t really think much in organizing words, so it is easy to do approximation. ;)

More about GPT-3 in the view of deep learning: How GPT-3 Works @jalammar

Grammar of this article was checked by the “transformers”, many thanks to them:
transformers

Image from Intro to GPT-3

Why Game Theory works

Think Forward

  1. People receive information
  2. People process information and think about it (interaction with belief)
  3. Try to evaluate available actions
  4. Make decisions and take actions

Thank Backward

  1. People take actions based on decisions they made
  2. People make decisoin based on evaluation to action according to information received

Game theory

As the action is limited to a person, it does not matter with the complex processes in their brain.

Now with limited action porson can take, the reward of each action is limited.

People try to predict the reward for evaluating each action. Now we say, the information people received does not matter.

Now we know limited evaluations to each action of a player in game is related to the result.

We can then simplify the process with a theory and we called it “Game Theory”.

For all possible action, there are evaluation results to take the action or not. Both the evaluations and actions are limited, so we can calculate it in way of mathematics.

Information doesn’t matter?

Okay it does, because to know how people evaluate the action, we need to know things they know about the action, reward and consequence.

Conclusion

If we know the payoff of all actions to a player in game, we can predict the result. This is Game Theory.

Good day =)

Pytorch with nvidia-docker on Ubuntu 18.04

Goal

A new computer with 2080 Ti just joint us. This time we try to use nvidia-docker.

We all loved docker continer don’t we? A Docker Tutorial for Beginners

Requirements

  • Ubuntu 16.04 or later
  • NVIDIA GPU(s) that support CUDA

Tips for LVM

If you install your Ubuntu with LVM, extend the LVM partition before anything else

1
2
3
4
$ sudo lvm
lvm> lvextend -l +100%FREE /dev/ubuntu-vg/ubuntu-lv
lvm> exit
$ sudo resize2fs /dev/ubuntu-vg/ubuntu-lv

The path /dev/ubuntu-vg/ubuntu-lv is physical device for my root, check your path with sudo fdisk -l.

Install GPU driver

Since CUDA is with the nvidia-docker all we need to do is to install GPU driver.

C++ compiler and other related tools are required to finish the installation, and I am sooooo L-A-Z-Y- that I just install everything I need to build anything.

1
$ sudo apt-get install build-essential

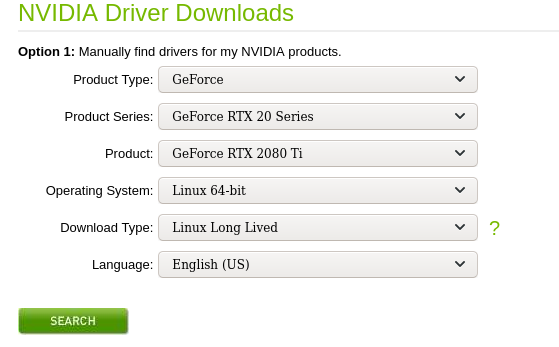
Find your driver from NVIDIA download center

Screen capture for downloading driver

You will need to answer few question during installation, so don’t leave the screen for too long.

Use docker for the project

Suppose you have installed docker, I choosed to install docker during installation of Ubuntu so it is come with my system… If you need to install it manually, check out official instructions Install Docker Engine on Ubuntu

It will be a good idea to use separated Docker for each project. It is easy to set up and run.

1
$ sudo docker run --gpus all nvidia/cuda nvidia-smi

I can see it printed the status for all my GPUs.

Use Pytorch docker

1
$ sudo docker run --gpus all pytorch/pytorch nvidia-smi

It works too, great!

Now mount our data and source code for a trail…

1
$ sudo docker run --gpus all --rm -v /home/user/code:/workspace -v /home/user/data:/data -v /home/user/outputs:/outputs pytorch/pytorch

Well done!

Turn Raspberry Pi 3B+ with Ubuntu Server 18.04 into Wired 4G Router

Previous

We have used Raspberry Pi as 4G LTE Router before with NOOBS Raspbian system. This time I installed Ubuntu Server 18.04 for the Raspberry Pi.

However, the workflow does not work as expected with the tutorial we did before. I have just fixed the problems and made it work, here is the new tutorial for newer system.

Driver

I assume you have finished the assembly, or you can check out the older tutorial.

Sixfab provides two methods to control the LTE module, PPP and QMI interface.

I used PPP connection here.

1
2
3
4
5
$ wget https://raw.githubusercontent.com/sixfab/Sixfab_PPP_Installer/master/ppp_installer/install.sh

$ chmod +x install.sh

$ sudo ./install.sh

Tips for options

  • Choose your Sixfab
    • 6 for the Raspberry Pi 3G/4G&LTE Base HAT (The option 2 for 3G, 4G/LTE Base Shield is compatible with 6)
  • APN
    • Google the APN for the service provider
    • Or insert the SIM Card to a phone and view the APN in settings
  • PORT name
    • For 3G, 4G/LTE Base Shield && Base HAT it will be ttyUSB3
    • Always ttyUSB3, no thing to do with physical port

Troubleshooting

Auto-connect not working

The automate establish connection bash script does not work on Ubuntu Server 18.04 start up. The connection will fail in start up. The solution is to run the script after boot.

I used crontab with @reboot to run the script after the booting instead of run it in start up.

1
crontab -e

If it is the first time to use crontab, a question will pop-up and ask for the default editor for editing crontab jobs. Default nano is suggested, just press Enter. And add the following line.

1
@reboot /usr/src/reconnect.sh

Ctrl+X, y, Enter to save the setting in nano.

Other problems

You can check out the older tutorial.

Wired Router

I have setup a wired router before, please follow the instructions there to set up the NAT connection and other DNS/DHCP server.

Beware of the patches below

File interfaces deprecated

Ubuntu Server 18.04 uses netplan, so we do not use /etc/network/interfaces, we edit the file /etc/netplan/50-cloud-init.yaml.

1
$ sudo nano /etc/netplan/50-cloud-init.yaml

And change the ethernets section:

1
2
3
4
5
6
7
8
9
network:
ethernets:
eth0:
addresses: [192.168.2.1/24]
gateway4: 192.168.2.1
nameservers:
addresses: [8.8.8.8,8.8.4.4]
dhcp4: no
version: 2

Now verify the yaml file.

1
$ sudo netplan try

It will ask user to type enter after passing the testing, if user did not press enter, after a timeout of 120 seconds will automatically rewrite the yaml file to default configuration. I guess it is a fail safe mechanism.

Now apply the configuration.

1
$ sudo netplan apply

Done!

More about netplan.

No wwan0 device

Change wwan0 to ppp0 in the commands in the old tutorial.

NAT does not work

In Ubnutu 18.04, the rc-local seem to be deprecated that iptables-restore will not be executed. Used crontab to replace it.

1
$ crontab -e

And add one more line at the bottom

1
@reboot sudo iptables-restore < /etc/iptables.ipv4.nat

DONE

Connect laptop to Raspberry Pi

1
2
3
4
5
$ ping 8.8.8.8
PING 8.8.8.8 (8.8.8.8) 56(84) bytes of data.
64 bytes from 8.8.8.8: icmp_seq=2 ttl=51 time=123.8 ms
64 bytes from 8.8.8.8: icmp_seq=1 ttl=51 time=82.9 ms
64 bytes from 8.8.8.8: icmp_seq=3 ttl=51 time=95.7 ms

在 Ubuntu 18.04 上安裝 CUDA 和 Pytorch

目標

發生了不幸的事件,於是要重裝某個 GTX 1070 Ti 的電腦,安裝了 Ubuntu Server 18.04 之後我對於如何安裝 CUDA 有些混亂了,於是做個記錄方便之後參考。

其實安裝步驟很簡單,但是文檔就好像很詳細、很複雜的樣子。

系統要求

  • Ubuntu 16.04 or later
  • NVIDIA GPU(s) that support CUDA

使用 LVM 的溫馨提示

我安裝 Ubuntu Server 18.04 的時候用了 LVM,硬盤瞬間縮水不夠用。原來默認是不放開所有空間給系統用,所以要調整空間大小

1
2
3
4
$ lvm
lvm> lvextend -l +100%FREE /dev/ubuntu-vg/ubuntu-lv
lvm> exit
$ resize2fs /dev/ubuntu-vg/ubuntu-lv

安裝 CUDA

CUDA 的版本其實不用管,詳細安裝文檔可以參考鏈接.

我已經安裝好最新的 Ubuntu Server LTS 版本,我知道它肯定支援 CUDA。而 GTX 1070 Ti也當然支援 CUDA。那就只有兩個編譯工具需要確認一下

我很懶惰,所以直接一鍵安裝所有編譯工具

1
$ sudo apt-get install build-essential

然後安裝適合當前內核的 kernel headers 以供安裝 CUDA

1
$ sudo apt-get install linux-headers-$(uname -r)

如果有自帶的驅動要先卸載,圖形化桌面要暫時關閉

1
2
sudo apt-get purge nvidia-cuda*
sudo apt-get purge nvidia-*

參見

然後去 CUDA Toolkit Download Page 下載安裝包,然後跟著網頁上的說明輸入指令。

Screen capture for downloading installation package

我選擇自動安裝腳本來安裝,中間要輸入同意用戶協議之類的。

將項目放到 Docker 容器裏

這樣更容易管理資源和系統依賴的各種版本,如果全都放在本地系統就容易互相污染。學學如何用 Docker 和 NVIDIA GPU 進行深度學習項目一鍵傳送.

1
$ docker run --gpus all nvidia/cuda:10.0-base nvidia-smi

安裝 Pytorch

你要有 Python 的軟件包管理器 pip,沒有就裝

1
$ sudo apt-get install python3-pip

然後安裝 Pytorch

1
$ pip3 install torch torchvision

如果你的環境和我不一樣,你需要 Pytorch 的官方指令生成器

Installing Pytorch with CUDA on Ubuntu 18.04

Goal

For some reason I need to reinstall operating system and CUDA on a deep learning machine with GTX 1070 Ti. After installed Ubuntu Server 18.04, I was confused with the NVIDIA document, so I write down this notes to keep a reference.

The procedures are actually very simple, but the document was a bit too detailed or the layout is too complex to find the key points, I was lost in the lines.

Requirements

  • Ubuntu 16.04 or later
  • NVIDIA GPU(s) that support CUDA

Tips for LVM

Since I installed the Ubuntu Server 18.04 with LVM, I soon used up all space. It seems the default space is just fit for the operating system. Solution to it is to extend the LVM partition.

1
2
3
4
$ sudo lvm
lvm> lvextend -l +100%FREE /dev/ubuntu-vg/ubuntu-lv
lvm> exit
$ sudo resize2fs /dev/ubuntu-vg/ubuntu-lv

Install CUDA

CUDA version does not really matter. Detailed Installation guide for your reference.

It is simple as I have installed the latest Ubuntu Server LTS version and I know it is supports CUDA things, I also sure GTX 1070 Ti supports CUDA. All I need to do now is to install GCC compiler and Linux development packages.

I am so lazy that I just install everything I need to build anything.

1
$ sudo apt-get install build-essential

Then install the kernel headers and development packages for the currently running kernel.

1
$ sudo apt-get install linux-headers-$(uname -r)

Now go to CUDA Toolkit Download Page download the installation package and follow the guide to install it.

Screen capture for downloading installation package

I choosed the easiest way to install, use a automated script. Copy the instructions, enter the terminal, press Enter key and wait… Few agreement will require manual input “accept” for EULA before proceed to install the package.

Use docker for the project

It will be a good idea to use Docker for each project. It is easy to set up and run. If you know how to work with Docker, check out the document.

1
$ docker run --gpus all nvidia/cuda:10.0-base nvidia-smi

Install Pytorch

Make sure pip is available for Python, install it if not.

1
$ sudo apt-get install python3-pip

And then install Pytorch.

1
$ pip3 install torch torchvision

Find the command for your environment from Pytorch Official document

在 Ubuntu 18.04 上安裝 ROCm 3.3.0 和 Pytorch

目標

現在我有一個可以跑 TensorFlow 的 RX 580 了。可是我還是不滿足,於是買了一個 VEGA 56。10.54 TFLOPS 的 FP32 運算能力現在好像也只要 266 美刀。

和之前一樣,在 Ubuntu Server 18.04 上安裝 ROCm 3.3.0 (參見之前的操作和系統要求)。

RX 580 不能用 Pytorch 了,Pytorch 說它太舊了

我基本上是按照 ROCm 的官方教學 不過有些地方可能出問題,這邊提供了指引去避免這些坑。

你至少要 16 GB 記憶體,不然編譯會很慢而且測試的時候會出錯,我試過了

準備編譯

安裝 Docker

我們使用 Docker 來編譯,避免污染系統的設置,這樣之後編譯其他版本的時候不會需要卸載和重新安裝。Docker 其實就類似是一個虛擬機,可以去官網瞭解更多 我現在都基本上不用虛擬機,全都用 Docker 了。

參考官方文檔安裝 Docker 或者你可以學我直接用一鍵安裝的腳本。官方說 千萬千萬要先自己檢查一下我們的腳本再運行,不然剛好有人惡意黑了我們改了腳本你就糟了。很貼心的說明。

1
2
3
$ curl -fsSL https://get.docker.com -o get-docker.sh
# 跑下面這句運行它之前,先打開來看看腳本裏面寫了什麼哦~
$ sudo sh get-docker.sh

安裝 ROCm-Dev 開發軟件包

編譯 Pytorch 之前要先安裝 rocm-dev提供 ROCm 的 API 接口

1
2
3
4
5
$ sudo apt-get update

$ sudo apt-get upgrade

$ sudo apt-get install rocm-dev

Docker 鏡像和下載代碼

下載編譯環境

現在我要編譯配合 ROCm 3.3.0 的 Pytorch了。官方文檔認爲你不可能是白癡,沒有告訴你記得檢查 docker pull rocm/pytorch:rocm3.0_ubuntu16.04_py3.6_pytorch 這句是不是對應你的 ROCm 版本。到 DockerHub 尋找你的 ROCm 版本的標籤來換掉文檔中的 rocm3.0_ubuntu16.04_py3.6_pytorch。我的 ROCm 3.3.0 是rocm3.3_ubuntu16.04_py3.6_pytorch

1
$ sudo docker pull rocm/pytorch:rocm3.3_ubuntu16.04_py3.6_pytorch

下載 Pytorch 源代碼

我們用 Git 來下載代碼,沒有的話請自行安裝:sudo apt-get install git

1
2
3
$ cd ~

$ git clone https://github.com/pytorch/pytorch.git

然後讓 Git 把其他依賴的代碼一鍵自動下載

1
2
3
4
5
$ cd pytorch

$ git submodule init

$ git submodule update

可是編譯的時候還是報錯,有部分的依賴好像還有自己的依賴,所以要跑 git submodule update --init --recursive 而不是 git submodule update。用 --recursive 將依賴的依賴的依賴的依賴什麼的都統統下載下來。

1
$ git submodule update --init --recursive

編譯!

先跑一下 rocminfo 並且記下你的 GPU 型號(例如我是 gfx 900)

進入編譯環境

這裏,再一次確認你的鏡像標籤,我的標籤是 rocm3.3_ubuntu16.04_py3.6_pytorch 對應 ROCm 3.3.0。你可能是其他版本需要修改再跑。

如果你想保留這個編譯的容器而不是完成之後自動移除,你可以移除 --rm 參數。

1
$ sudo docker run -it -v $HOME:/data --privileged --rm --device=/dev/kfd --device=/dev/dri --group-add video rocm/pytorch:rocm3.3_ubuntu16.04_py3.6_pytorch

之後應該會看到一個類似這樣的環境。

1
root@f78375b1c487:/#

切換到代碼的位置

1
root@f78375b1c487:/# cd /data/pytorch

開始編譯

你需要先指出你的 GPU 型號。如果你忘記事先用 rocminfo 查看的話,可以去查表 我是 VEGA 56 是 gfx900,用這行指令指定。

1
root@f78375b1c487:/# export HCC_AMDGPU_TARGET=gfx900

然後就用這個自動建構的指令

1
root@f78375b1c487:/# .jenkins/pytorch/build.sh

如果你沒有足夠的記憶體,將會花費你很長時間……

測試

運行自動測試腳本

1
root@f78375b1c487:/# PYTORCH_TEST_WITH_ROCM=1 python test/run_test.py --verbose

然後大概你會出現 Import Error : no module named torch 的問題。

那樣的話,你需要確認你的 Python 版本。我的情況是這樣的:

1
2
3
4
5
6
root@f78375b1c487:/# python -V
Python 2.7.18
root@f78375b1c487:/# python3 -V
Python 3.5.8
root@f78375b1c487:/# python3.6 -V
Python 3.6.10

這個 Pytorch 應該是編譯並且安裝給了 Python 3.6,所以要用 Python 3.6 來測試才對。

1
root@f78375b1c487:/# PYTORCH_TEST_WITH_ROCM=1 python3.6 test/run_test.py --verbose

出錯?

如果沒有 16 GB RAM 就會出現 malloc 無法賦予位置的錯誤

Install torchvision

試試安裝 torchvision,應該是在編譯過程中已經一起安裝了的。

1
root@f78375b1c487:/# pip install torchvision

保存這個 Docker 容器

用容器 ID 來保存它,ID 一直都在上面有顯示,例如我的就是 f78375b1c487

1
$ sudo docker commit f78375b1c487 -m 'pytorch installed'

如果退出這個容器的話就什麼也沒有了(前面執行 docker run 的時候使用的 --rm 參數發揮效用),所以需要在另一個指令行裡執行 commit。你可以另外開一個命令行(Terminal)窗口,或者用 Ctrl+Alt+F3 進入另一個黑底白字的命令行介面,或者如果你是和我一樣在用 tmux,就 Ctrl+B 然後再輸入 C 再開一個窗口來執行 commit

DONE

學學如何用 Docker 吧,它與你來日方長。

Pytorch time! (>w<)b

在 Ubuntu 18.04 上安裝 ROCm 3.3.0 和 TensorFlow

目標

我一直覺得 AMD 出的幾張織女星顯卡很是吸引。 VEGA 56VEGA 64 都是很強勁的計算裝置,和 NVIDIA 2080 Ti 不相上下。 Radeon VII 更是讓我流口水,13.44 TFLOPS FP32 (float) 運算能力(理論值)而且只有 2080 Ti 的一半價錢。

爲了嘗試 AMD 的表現,和依賴庫的穩定性,我買了一張 RX 580 來玩,只花了我100美刀。AMD Radeon RX 580 感覺性價比很高,有 6 TFLOPS 的運算能力。

NVIDIA 的 GPU 就用 CUDA 來跑,那 AMD 怎麼安裝 CUDA 呢?不怕,我們有 ROCm 來替代 CUDA。

前提

對於使用性價比超高的 AMD GPU 來跑模型我已經迫不及待了,不過原來 ROCm 有很多要求,不是隨便哪個舊電腦就可以跑的。

  • 要有比較新的 CPU 支援 PCIe Gen3 和 PCIe Atomics 操作的才行
  • 底板要支援 PCIe 3.0
  • GPU 也要比較新的才行,AMD 說太舊的顯卡性能太差懶得支援了
  • 更新你的 Linux 系統到內核版本 kernel 4.17 以上(如果你用 Windows 就不行了)

支援的 CPU 型號

  • AMD Ryzen CPUs
  • The CPUs in AMD Ryzen APUs
  • AMD Ryzen Threadripper CPUs
  • AMD EPYC CPUs
  • Intel Xeon E7 v3 或以上
  • Intel Xeon E5 v3 或以上
  • Intel Xeon E3 v3 或以上
  • Intel Core i7 v4 或以上 (i.e. 要 Haswell 或更新的架構)
  • Intel Core i5 v4 或以上
  • Intel Core i3 v4 或以上
  • 某些 Ivy Bridge-E systems

原文鏈接

我也不知道 “某些 Ivy Bridge-E systems” 是哪些,有需要的話請前往提問。他們說有限度支援某些舊 CPU 和 GPU,不過最好就不要自尋短見了,除非你想幫忙搞底層代碼來支援那些硬件。

支援的 GPU 型號

  • GFX8 GPUs
    • “Fiji” 晶片,例如 AMD Radeon R9 Fury X 和 Radeon Instinct MI8
    • “Polaris 10” 晶片,例如 AMD Radeon RX 580 和 Radeon Instinct MI6
  • GFX9 GPUs
    • “Vega 10” 晶片,例如 AMD Radeon RX Vega 64 和 Radeon Instinct MI25
    • “Vega 7nm” 晶片,例如 Radeon Instinct MI50, Radeon Instinct MI60 和 AMD Radeon VII

參考 原文. 有些 GFX8 和 GFX7 系列的 GPU 碰巧可以支援,不過如果出問題的話,也沒人可以幫你解決了。順帶一提我的 RX 580 後來發現 Pytorch 不支援了,嫌棄我的 GPU 舊。.

安裝 ROCm

我的配置

  • i5-4570 CPU
  • RX 580 GPU
  • Ubuntu Server 18.04.

官方的教學 可以直接用,除非你想用 Pytorch,那可能有幾個不起眼的地方官方忘記提醒你要注意。可以汲取我的教訓避免再入坑。

前期準備

如果你安裝 Pytorch 就要記一下你選的 ROCm 版本,我裝 ROCm 3.3.0。

先更新系統,然後安裝 libnuma-dev 然後重啓

1
2
3
4
5
6
7
$ sudo apt update

$ sudo apt dist-upgrade

$ sudo apt install libnuma-dev

$ sudo reboot

安裝 ROCm

將 ROCm 的下載位置加入到系統的軟件包管理當中

1
2
3
$ wget -q -O - http://repo.radeon.com/rocm/apt/debian/rocm.gpg.key | sudo apt-key add -

$ echo 'deb [arch=amd64] http://repo.radeon.com/rocm/apt/debian/ xenial main' | sudo te

然後用系統的軟件包管理自動安裝

1
2
3
$ sudo apt update

$ sudo apt install rocm-dkms

安裝善後

記得幫你自己的用戶加入 GPU 的操作權限

1
$ sudo usermod -a -G video $LOGNAME

如果你要考慮再加其他用戶就請去複製官方文檔的指令

然後重啓系統

1
$ sudo reboot

測試安裝及啓用

測試 ROCm 的安裝

1
2
$ /opt/rocm/bin/rocminfo
$ /opt/rocm/opencl/bin/x86_64/clinfo

你應該會看到一些類似報告表格的東西,那就說明安裝成功了。

接下來將 ROCm 植入系統的環境 PATH 當中讓其他程序可以找得到它

1
2
$ echo 'export PATH=$PATH:/opt/rocm/bin:/opt/rocm/profiler/bin:/opt/rocm/opencl/bin/x86_64' |
> sudo tee -a /etc/profile.d/rocm.sh

安裝 TensorFlow

這個很簡單,只有兩步,不過現在好像默認安裝 2.0 以上最新版本,如果你要安裝其他版本要自己指定版本,不會的話去問問谷歌pip安裝如何指定版本參考原文說明書

1
2
3
4
5
6
7
$ sudo apt update

$ sudo apt install rocm-libs miopen-hip cxlactivitylogger rccl

$ sudo apt install wget python3-pip

$ pip3 install --user tensorflow-rocm

現在 TensorFlow 2 應該是已經成功安裝了!可喜可賀 (^_^)b

Installing Pytorch with ROCm 3.3.0 on Ubuntu 18.04

Goal

I have my RX 580 ready for TensorFlow, I tried to install Pytorch but it say my GPU is too old and they do not support now. I brought a VEGA 56 with 10.54 TFLOPS for FP32 from newegg.com at price 266 USD. Let’s install Pytorch on top of ROCm 3.3.0.

First of all, install ROCm 3.3.0 (refer to previous tutorial), requirements are the same.

We follow the instructions from ROCm first, and I will add solution to problem I encountered.

You will need to have 16 GB RAM or more to finish the whole compile, install and test process.

Install dependencies

Install Docker

You will need Docker to finish the installation. Docker is similar to virtual machine simulate a operating system environment isolate from your computer but Docker is much lighter and faster, learn more from their docuements.

Install Docker with instructions from Docker official document or you can use their convenience script. And examine scripts downloaded from the internet before running them locally. Make sure no one added a line to install a trojan into your computer.

1
2
3
$ curl -fsSL https://get.docker.com -o get-docker.sh

$ sudo sh get-docker.sh

Install ROCm-Dev package

We are going to compile Pytorch from source, it requires rocm-dev package.

1
2
3
4
5
$ sudo apt-get update

$ sudo apt-get upgrade

$ sudo apt-get install rocm-dev

Step Two

Prepare environment for compiling

Now we get the compilation environment for ROCm 3.3.0. The official document is not up-to-date which tells you to run docker pull rocm/pytorch:rocm3.0_ubuntu16.04_py3.6_pytorch. You should go to their DockerHub and make sure the tag rocm3.0_ubuntu16.04_py3.6_pytorch is what you need. For ROCm 3.3.0 I need rocm3.3_ubuntu16.04_py3.6_pytorch so I run:

1
$ sudo docker pull rocm/pytorch:rocm3.3_ubuntu16.04_py3.6_pytorch

Prepare source code for compiling

Now clone the source code of Pytorch with Git, do sudo apt-get install git if you don’t have git.

1
2
3
$ cd ~

$ git clone https://github.com/pytorch/pytorch.git

And then clone the other required source code automatically.

1
2
3
4
5
$ cd pytorch

$ git submodule init

$ git submodule update

I would suggest you to run git submodule update --init --recursive instead of git submodule update as some of the required source code may have their own required repository which needs to download with --recursive flag.

1
$ git submodule update --init --recursive

Compile and Install

Enter environment for compiling

Make sure the tag is correct before you run this command, my tag was rocm3.3_ubuntu16.04_py3.6_pytorch for ROCm 3.3.0. Official document forgot to remind you that the tag really matters.

1
$ sudo docker run -it -v $HOME:/data --privileged --rm --device=/dev/kfd --device=/dev/dri --group-add video rocm/pytorch:rocm3.3_ubuntu16.04_py3.6_pytorch

And you will get something look another terminal:

1
root@f78375b1c487:/#

Now we change to the mounted source code directory:

1
root@f78375b1c487:/# cd /data/pytorch

We now start building

Export the right code for GPU. You can check the code by running rocminfo on your host (out side the docker) from another terminal. Or you can find it here Ctrl+F search your GPU. gfx900 for VEGA 56.

1
root@f78375b1c487:/# export HCC_AMDGPU_TARGET=gfx900

Start compiling

An automated script is provided, just run the following command will build and install everything to the docker container.

1
root@f78375b1c487:/# .jenkins/pytorch/build.sh

Test

Before we finish everything, we need to run a test.

You may run the script for test…

1
root@f78375b1c487:/# PYTORCH_TEST_WITH_ROCM=1 python test/run_test.py --verbose

And it may say Import Error : no module named torch. No worry, it is easy to fix.

Check your Python version

1
2
3
4
5
6
root@f78375b1c487:/# python -V
Python 2.7.18
root@f78375b1c487:/# python3 -V
Python 3.5.8
root@f78375b1c487:/# python3.6 -V
Python 3.6.10

Since the Pytorch was compiled and installed for Python 3.6, you need to use Python 3.6 for running the test.

1
root@f78375b1c487:/# PYTORCH_TEST_WITH_ROCM=1 python3.6 test/run_test.py --verbose

Error?

If you do not have 16 GB RAM, it will use up all the memeory and malloc will raise error for unable to allocate memory.

If you try to run the test with RX 580, Pytorch will tell you the GPU is too old and their do not support now.

Finishing

Install torchvision

Try to install it and you suppose to see it already installed with your compilation and installation of Pytorch.

1
root@f78375b1c487:/# pip install torchvision

Save the container

Use the container ID to save it into image so you can use it for different project and prevent environment contamination of different dependencies. The container ID is the hash showing in your terminal for container, f78375b1c487 for mine.

1
$ sudo docker commit f78375b1c487 -m 'pytorch installed'

Change f78375b1c487 to your container ID.

The docker container will be automatically removed after quit the environment. Therefore you will need to commit the container with another terminal. If you are using Command Line Interface, use Ctrl+Alt+F3 (Usually F7 is the Graphic Desktop, on Fedora it is F2) to switch to another terminal. I used tmux so I Ctrl+B and then press % create a new terminal on screen. And commit the container.

DONE

Pytorch time! (>w<)b

And I think you may need a tutorial for Docker to get on.